Follow Me On Social Media!
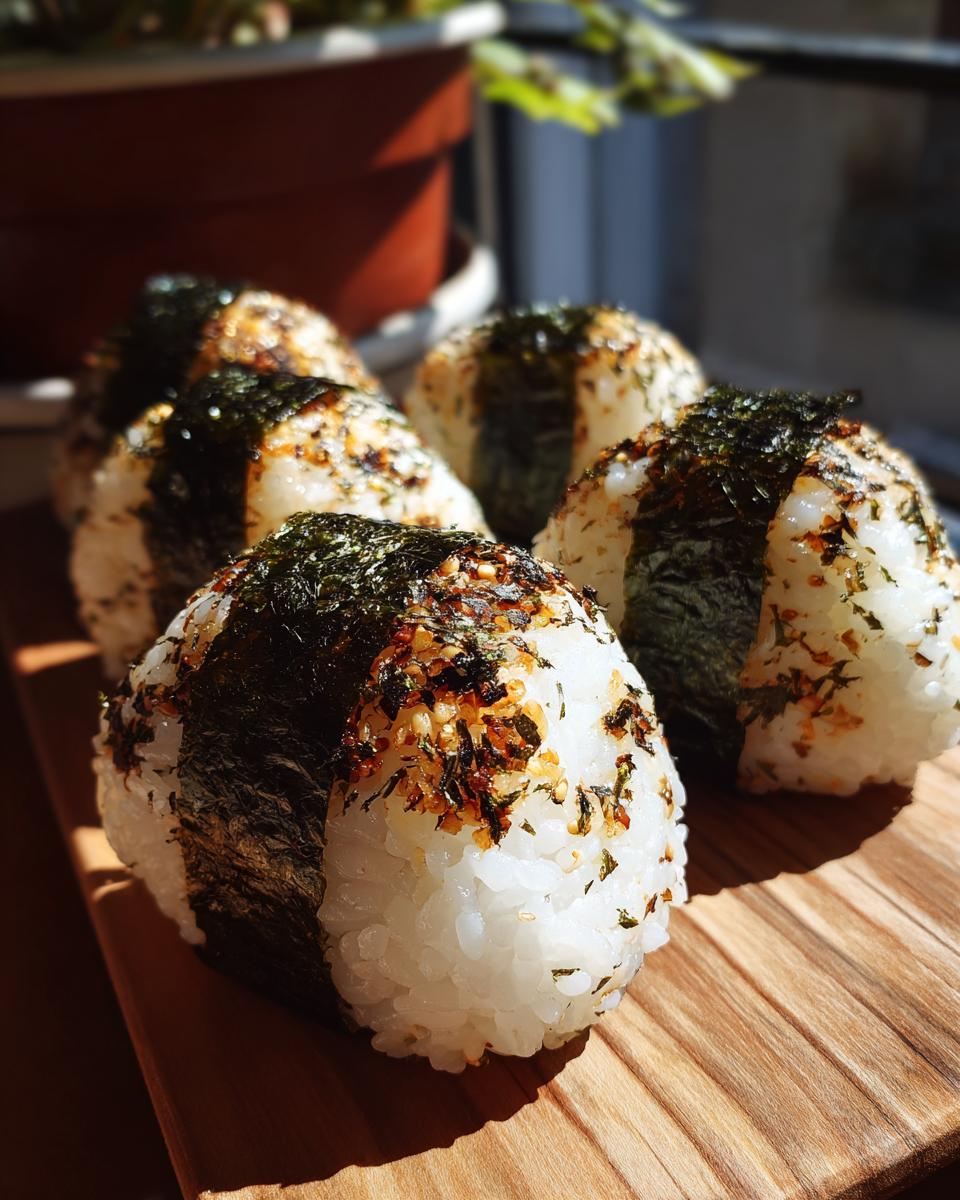
Perfect Onigiri (Rice Balls) in 15 Minutes
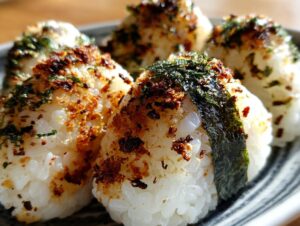
Oh, onigiri! You know, these little rice balls are just the best, aren’t they? I remember the first time I ever tried making them myself. It felt a bit intimidating, trying to get that perfect shape, but honestly, it’s way easier than you think! Onigiri are such a staple in Japan, perfect for a quick snack on the go, tucked into a lunchbox, or just when you need a little something comforting. They’re so simple, yet so satisfying. This recipe is my go-to, and I’m so excited to share it with you because, trust me, once you master these delicious Onigiri (Rice Balls), you’ll be making them all the time!
Why You’ll Love This Onigiri (Rice Balls) Recipe
Seriously, this onigiri recipe is a winner for so many reasons:
- It’s incredibly easy and quick to make – perfect for busy days!
- You can customize them with all sorts of fillings and seasonings.
- They’re super portable, making them ideal for lunches or snacks.
- The combination of fluffy rice, savory furikake, and a hint of sesame oil is just pure comfort food perfection.
- Plus, they look so cute and appealing, don’t they?
Essential Ingredients for Perfect Onigiri (Rice Balls)
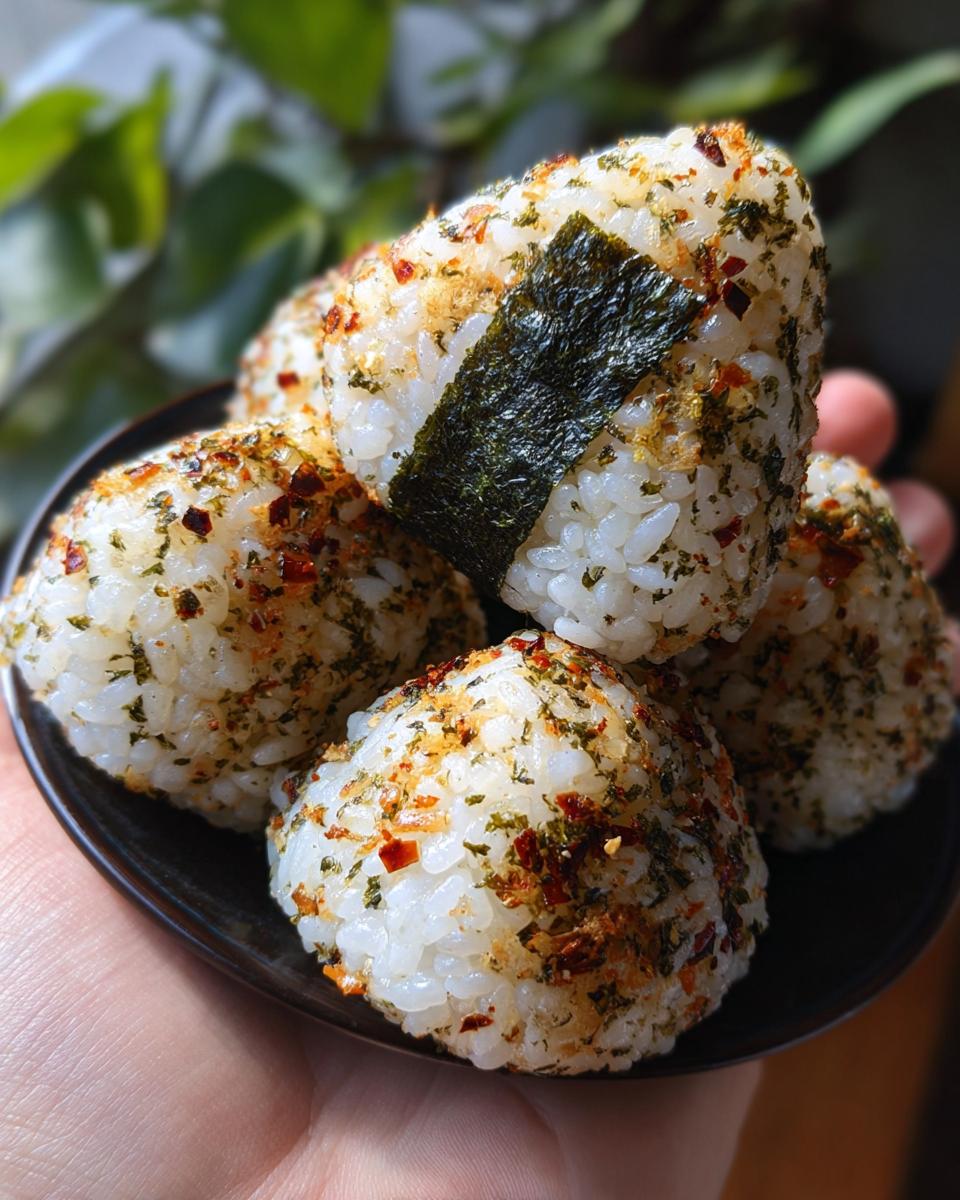
Alright, let’s talk about what you’ll need to make these little flavor bombs. First up, you absolutely need 2 cups of cooked sushi rice, and it’s best if it’s still a little warm. This is key for getting that perfect sticky texture that holds everything together. Don’t use long-grain or fluffy rice; it just won’t work the same! Then, you’ll want about 1/4 cup of furikake. This is that magical Japanese rice seasoning – it comes in tons of flavors, so feel free to grab your favorite! I really love the classic sesame and seaweed one. For a little extra oomph, we’ll add 1 tablespoon of toasted sesame oil; it really brings out a lovely nutty aroma. And of course, just a pinch of salt, to taste, because even with the furikake, a little extra salt can make all the difference. If you’re feeling fancy, or just want that classic look, grab some nori seaweed sheets, cut into strips. They’re totally optional but add a great little crunch and flavor!
Ingredient Notes and Substitutions for Onigiri (Rice Balls)
So, let’s break down some of these ingredients because they really do matter! Sushi rice is called that for a reason – it’s got a higher starch content, which makes it wonderfully sticky when cooked. If you absolutely can’t find sushi rice, you *could* try medium-grain rice, but you might need to adjust the water a bit and be extra careful with the shaping. Furikake is your best friend here; it’s packed with flavor! If you don’t have any on hand, you can totally mix toasted sesame seeds with a little dried seaweed (like crumbled nori) and a pinch of salt and sugar. For the sesame oil, make sure it’s toasted sesame oil – the regular stuff doesn’t have the same punch. And for the nori, any kind works, but the pre-cut strips are super convenient!
Step-by-Step Guide to Crafting Onigiri (Rice Balls)
Okay, get ready to make some magic! It’s time to turn that delicious rice into those adorable little onigiri. First things first, grab a nice big bowl. Gently fold in your furikake, that sesame oil, and a pinch of salt into the warm sushi rice. Be super gentle here, okay? You don’t want to mash up those rice grains; we want them to stay distinct but sticky. Think of it like gently fluffing a pillow, not stirring a stew. Once everything is nicely mixed and the rice has cooled down just enough so you don’t burn your hands (warm is good, hot is bad!), it’s shaping time!
Now, here’s the secret weapon: water! Keep a small bowl of water nearby. Dip your hands in it, and then shake off most of the excess water. This is going to stop the rice from sticking to you like glue. Grab about half a cup of the rice mixture – it feels like a good amount, not too much, not too little. Start by cupping it in your hands and gently pressing it together. You can form it into a classic ball or go for the cute triangle shape. Just keep pressing and turning, using the palms of your hands and your fingers to guide it. If it starts sticking, just a quick dip of your hands in water and you’re good to go!
If you’re adding nori, now’s the time to wrap a little strip around your onigiri. It looks so professional and gives you a nice little handle to hold onto. Repeat this whole process – wet hands, scoop rice, shape gently, add nori – until all your rice is transformed into these little treasures. It’s really that simple!
Shaping Your Onigiri (Rice Balls) with Ease
Shaping is where the fun REALLY happens! Remember those damp hands? Keep them slightly wet as you work. Take about a half-cup of the seasoned rice. For a ball, just cup your hands and gently rotate the rice, pressing lightly to form a sphere. If you want a triangle, which I just adore, start by making a rough ball, then use the side of your hand or your index finger to press one side in, creating a sort of pyramid shape. Just keep gently pressing and turning until it feels firm enough to hold its shape, but not so firm that it’s dense and hard. It should feel substantial, not like a brick!
Adding Fillings and Flavor to Your Onigiri (Rice Balls)
This is where you can really let your personality shine! Once you have your rice mixture ready and you’ve wet your hands, take a portion of the rice and flatten it in your palm. Make a little well in the center. Now, spoon in a small amount of your chosen filling – maybe some flaked salmon, or a dollop of tuna mayo, or even a salty pickled plum (umeboshi!). Then, carefully bring the edges of the rice up and around the filling, pinching them together gently to seal it all inside. Make sure there are no big gaps. Then, proceed with shaping your ball or triangle as usual. The furikake and sesame oil are already in the rice, giving it that amazing base flavor, but the filling adds that extra pop!
Tips for Success When Making Onigiri (Rice Balls)
Okay, so you want your onigiri to be just perfect? A few little tricks up my sleeve! First, always use rice that’s still a bit warm. Not burning hot, mind you, but warm. It makes the rice so much easier to mold and stick together. And please, be gentle when you’re mixing in the furikake and seasoning! You really don’t want to mash the rice grains; we’re aiming for that lovely tender texture, not a sticky paste. Keep a small bowl of water handy, and just dip your fingers or palms whenever the rice starts to feel a little clingy. It’s the best way to get a good grip without squishing everything. Don’t over-pack the rice when you’re shaping, either. You want them firm enough to hold their shape, but still pleasantly soft inside. A light touch is really key!
Serving and Storing Your Delicious Onigiri (Rice Balls)
These little guys are so versatile! You can serve them right after making them, maybe with a little dish of soy sauce for dipping if you like, or pack them into a bento box for a super cute and satisfying lunch. They’re perfect on their own, too! If you happen to have leftovers (which is rare in my house!), just let them cool completely. Then, wrap them up tightly in plastic wrap or pop them into an airtight container. You can enjoy them cold the next day, or if you prefer them warm, a quick zap in the microwave for about 15-20 seconds should do the trick. Just be careful not to overheat them, or they can get a bit tough!
Frequently Asked Questions About Onigiri (Rice Balls)
Got questions about making these yummy rice balls? I’ve got answers!
Q: What’s the best kind of rice to use for onigiri?
You really want to use Japanese short-grain sushi rice. It’s got that perfect sticky texture that holds everything together beautifully. Other types of rice just don’t have that same clinginess, so they can be a bit trickier to shape.
Q: Can I make onigiri ahead of time?
Absolutely! They’re great for making the night before. Just make sure they’re completely cooled before you wrap them up tightly in plastic wrap. They’re delicious cold, or you can give them a quick warm-up in the microwave if you like.
Q: What are some popular fillings for onigiri?
Oh, the possibilities are endless! Flaked salted salmon is a classic, and so is tuna mixed with Japanese mayo. Pickled plum (umeboshi) is another traditional favorite – it’s got a great salty and sour kick. You can also try cooked chicken, seasoned vegetables, or even just a bit of mentaiko (spicy cod roe)! For more inspiration on global flavors, check out these global comfort foods.
Q: How long do onigiri usually last?
If you store them properly in the fridge, they should be good for about 2 days. But honestly, they’re best enjoyed within the first day. The texture is just so much better when they’re fresh!
Q: Is this onigiri recipe vegetarian?
This specific recipe, with furikake and sesame oil, is vegetarian. However, if you add fillings like salmon or tuna, it would no longer be vegetarian. Just be mindful of your chosen additions!
Nutritional Information for Onigiri (Rice Balls)
Here’s a general idea of what you’ll find in one of these tasty onigiri, but remember, it can vary a bit depending on your exact ingredients and portion size! Each serving typically has around 150 calories, with about 2g of fat, 30g of carbohydrates, and 3g of protein. It also contains roughly 200mg of sodium. These little rice balls are a pretty balanced snack, offering a good source of energy without being too heavy. For other healthy snack ideas, you might like this Spicy Chickpea Quinoa Power Bowl.
Print
Perfect Onigiri (Rice Balls) in 15 Minutes
- Total Time: 15 minutes
- Yield: 4-6 servings 1x
- Diet: Vegetarian
Description
A simple and delicious Japanese rice ball, perfect for a quick snack or meal.
Ingredients
Scale
- 2 cups cooked sushi rice
- 1/4 cup furikake (rice seasoning)
- 1 tablespoon sesame oil
- Salt to taste
- Nori seaweed sheets for wrapping (optional)
Instructions
- In a bowl, gently mix the cooked sushi rice with furikake, sesame oil, and salt.
- Let the rice cool slightly so it’s easier to handle.
- Wet your hands with water to prevent sticking.
- Take about 1/2 cup of rice and shape it into a ball or triangle.
- If using nori, wrap a strip around the onigiri.
- Repeat with the remaining rice.
Notes
- You can add fillings like cooked salmon, tuna mayo, or pickled plum inside the onigiri before shaping.
- Experiment with different furikake flavors.
- Keep your hands slightly damp while shaping for easier handling.
- Prep Time: 15 minutes
- Cook Time: 0 minutes
- Category: Snack
- Method: Shaping
- Cuisine: Japanese
Nutrition
- Serving Size: 1 onigiri
- Calories: 150
- Sugar: 1g
- Sodium: 200mg
- Fat: 2g
- Saturated Fat: 0.5g
- Unsaturated Fat: 1.5g
- Trans Fat: 0g
- Carbohydrates: 30g
- Fiber: 1g
- Protein: 3g
- Cholesterol: 0mg
Keywords: onigiri, rice balls, japanese food, snack, easy recipe, furikake