Follow Me On Social Media!
Tangy Fermented Pickles: Gut-Friendly Flavor 5 Ways
Oh, I’m so excited you’re here! If you’re anything like me, you’ve probably heard all the buzz about Fermented, Pickled, Gut-Friendly Foods and wondered if it’s really worth the hype. Let me tell you, it absolutely is! There’s something incredibly satisfying about taking simple ingredients and transforming them into these fizzy, tangy pickles right in your own kitchen. I remember my first attempt – a little nervous, sure, but the smell of the brine and spices was just amazing. This recipe is my go-to because it’s ridiculously easy, packed with all those good-for-you probiotics, and the flavor is just out of this world. Get ready to dive into the wonderful world of homemade fermented pickles!
Why You’ll Love These Fermented, Pickled, Gut-Friendly Foods
Seriously, you are going to adore making these pickles! They’re not just some boring jarred thing from the store, oh no. These are the real deal, made with love and good intentions right on your countertop.
- Taste explosion! They have this amazing tangy, slightly sour flavor with just the right crunch. So much better than those sad, floppy pickles you sometimes find.
- Gut health booster! These are literally bursting with probiotics, which is fantastic for your gut health. Think happy tummy, happy you!
- Super easy – I mean, really easy. You basically just chop, pack, and wait. No fancy equipment needed, trust me!
- So satisfying to pull a jar of these beauties out of the fridge knowing YOU made them. It feels like a little kitchen superpower.
Packed with Probiotics for a Happy Gut
This is the part that gets me really excited! The magic of fermentation is that it creates all these amazing little probiotic powerhouses. As the good bacteria munch away on the sugars in the cucumbers, they produce lactic acid, which gives the pickles that yummy tang and, more importantly, makes them super beneficial for your gut health. It’s like giving your insides a little healthy party!
Simple to Make, Even for Beginners
Don’t let the word “fermentation” scare you! This recipe is so straightforward, I promise even if you’ve never fermented anything before, you’ll nail it. It’s mostly just waiting around for the good stuff to happen. The active prep time is seriously like 15 minutes tops. You really can’t mess this up!
Incredible Flavor and Versatility
Oh, the flavor! These pickles are crisp, tangy, and have this lovely depth from the garlic and dill seeds. They’re perfect on sandwiches, chopped into salads, served alongside some grilled meats, or just eaten straight from the jar (my personal favorite!). They add a fantastic pop of flavor to pretty much anything.
Essential Ingredients for Fermented, Pickled, Gut-Friendly Foods
Okay, gathering your ingredients is half the fun! It’s so simple but these specific things really make all the difference for delicious, gut-friendly pickles. Here’s what you’ll need:
- 1 pound Kirby cucumbers, washed thoroughly. We’ll talk more about why Kirby ones are the best in a sec!
- 2 cups filtered water. This is super important – no tap water with chlorine, please!
- 1 tablespoon sea salt. Again, a good quality salt makes a big difference.
- 2 cloves garlic, smashed. Just give them a good whack with the flat side of your knife.
- 1 teaspoon dill seeds. These add that classic pickle flavor.
- 1/2 teaspoon mustard seeds. For a little zing!
- 1/4 teaspoon red pepper flakes (optional, for a touch of heat). Only if you like a little kick!
Cucumber Selection for Optimal Fermentation
When it comes to picking your cucumbers, you really want to go for Kirby cucumbers if you can find them. They’re usually smaller, firmer, and have thicker skin, which means they hold up way better during the fermentation process. Look for ones that are firm to the touch, bright green, and have no soft spots. That firmness is key to getting that perfect, satisfying crunch!
The Importance of Brine Ingredients
The brine is basically the lifeblood of our pickles! Using filtered water is a must because chlorine in tap water can really mess with the good bacteria that make fermentation happen. Think of it as giving our little probiotic friends a clean, happy environment to work in. And the salt? It’s not just for flavor; it actually draws out moisture from the cucumbers and helps preserve them. Sea salt is my favorite because it has all those trace minerals that are good for us, and it dissolves nicely to create that perfect salty base for our tangy pickles.
Step-by-Step Guide to Making Fermented, Pickled, Gut-Friendly Foods
Alright, let’s get down to business and make some amazing pickles! It’s really not complicated at all, I promise. Just follow these simple steps and you’ll have delicious, gut-friendly goodness in no time.
Preparing Your Cucumbers and Jar
First things first, give those Kirby cucumbers a really good wash under cool running water. You want to get rid of any dirt or grime. Then, grab a clean jar – I like to use a wide-mouth quart-sized jar. Make sure it’s super clean, maybe even run it through the dishwasher or wash it with hot, soapy water and rinse really well. We don’t want any unwanted guests messing with our fermentation!
Crafting the Perfect Brine
Now for the brine, which is basically the magical liquid that makes everything happen. Grab your filtered water (remember, no chlorine!) and pour it into a separate bowl or pitcher. Add your sea salt and stir, stir, stir until it’s completely dissolved. No salty surprises at the bottom, okay? This salty water is what’s going to preserve the cucumbers and create the perfect environment for those good bacteria to party.
Layering Flavors for Your Fermented, Pickled, Gut-Friendly Foods
Time to add some flavor flair! Take your smashed garlic cloves – just give them a good whack with the back of a knife, no need to mince – and toss them into the bottom of your clean jar. Then, add your dill seeds, mustard seeds, and those optional red pepper flakes if you’re feeling a little spicy. These little guys are going to infuse the whole jar with amazing pickle flavor as they ferment.
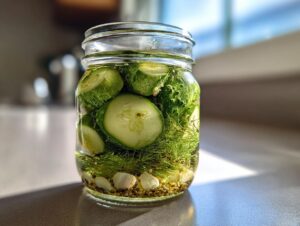
Packing and Submerging Cucumbers
Now, pack those cucumbers into the jar pretty snugly. If they’re a bit long, don’t worry, you can just trim the ends a little to make them fit. The goal is to get as many in there as possible without squishing them too much. Once they’re packed in, pour that beautiful salty brine over the top, making sure all the cucumbers are completely covered. This is super important! If any bits poke out, they could get moldy. Use a fermentation weight, a smaller jar filled with water, or even a clean plastic bag filled with brine to keep everything pushed down and submerged.
The Art of Fermentation: What to Expect
Time for the waiting game! Loosely cover your jar. You can use a special fermentation lid, or just a regular lid with the ring loosened a bit. This lets the gases produced during fermentation escape, otherwise, your jar could get a little… explosive. Place the jar in a cool, dark spot – like a cupboard or pantry. Over the next few days, you might see bubbles forming, which is totally normal and a sign that things are happening! You might also see some white scum on the surface; just skim that off with a clean spoon. After about 5 days, give one a taste. If it’s tangy enough for you, great! If not, let it keep fermenting until it’s just right.
Storing Your Delicious Fermented, Pickled, Gut-Friendly Foods
Once those pickles have reached your perfect level of tangy deliciousness, take out the fermentation weight. Screw on a tight lid and pop the whole jar into the refrigerator. This slows down the fermentation process like crazy, so they won’t get too sour too fast. They’ll keep getting better and better in there!
Tips for Success with Fermented, Pickled, Gut-Friendly Foods
You’re doing great! To make sure your pickles turn out perfectly tangy and delicious every time, here are a few little tricks I’ve learned. Keeping your fermentation happy is all about the right environment. Try to keep your jar in a spot that stays pretty consistent in temperature, ideally around 65-75°F (18-24°C). If it’s too hot, they can ferment too quickly and get mushy, and if it’s too cold, they might not ferment at all. Also, don’t panic if you see a little white film or scum on top – that’s totally normal! Just skim it off with a clean spoon. What you *don’t* want is fuzzy mold, which is usually brightly colored. If you see that, unfortunately, the batch is a goner, but it’s rare if you’re careful with cleanliness!
Troubleshooting Common Fermentation Issues
If you don’t see any bubbles after a few days, don’t worry! It might just be a little shy. Try moving the jar to a slightly warmer spot. If you do see fuzzy mold, sadly, you’ll have to toss it and start over, making sure everything was super clean and the cucumbers stayed submerged. Lack of bubbles usually just means it’s a bit cooler than ideal, so patience is key!
Achieving the Perfect Tangy Flavor
This is totally up to your taste buds! Start tasting your pickles around day 5. If they’re not tangy enough, just let them keep doing their thing. Pop them back in the cupboard for another few days and taste again. The longer they ferment, the more sour they’ll get. It’s a bit of an art, but you’ll figure out your sweet spot—or should I say, your *sour* spot!
Ingredient Notes and Substitutions for Fermented, Pickled, Gut-Friendly Foods
Let’s chat a bit more about these ingredients, because they really do matter for getting the best flavor and results. For your cucumbers, Kirby is definitely king here – they’re just naturally firmer and hold their shape better, which means a crispier pickle. If you absolutely can’t find them, though, pickling cucumbers or even smaller, firmer regular cucumbers will work in a pinch, just be aware they might not be quite as crunchy. When it comes to salt, if you don’t have sea salt, kosher salt is the next best bet. Just make sure it’s pure salt without any anti-caking agents or iodine, as those can interfere with the fermentation. Avoid iodized table salt at all costs!
Alternative Spice Combinations
Don’t be afraid to get creative with your spices! While dill seeds and mustard seeds are traditional, you can totally switch things up. Try adding a few peppercorns, a bay leaf, a sprig of fresh dill (just make sure it’s submerged!), or even some coriander seeds. A slice of fresh ginger or a few allspice berries can also add a really interesting depth of flavor. Just remember to keep the salt and water ratio the same!
Serving Suggestions for Your Fermented, Pickled, Gut-Friendly Foods
Okay, so you’ve got this amazing jar of tangy, crunchy pickles, now what? Oh, the possibilities! These aren’t just for sandwiches, though they are *phenomenal* on a classic BLT or a hearty deli stack. Chop them up and toss them into your favorite potato salad or tuna salad for a fantastic burst of flavor and crunch. They’re also a must-have on any charcuterie board or cheese platter – that sour kick cuts through the richness perfectly. Don’t forget to serve them alongside grilled meats or burgers as a refreshing side. Honestly, sometimes I just grab a fork and eat them straight from the jar while standing at the fridge. No judgment here!
Storing and Reheating Your Fermented, Pickled, Gut-Friendly Foods
Once your pickles have reached that perfect tangy point, it’s time to slow things down. Just seal the jar tightly with a regular lid and pop it into the refrigerator. This keeps them from fermenting too quickly and getting overly sour. Stored this way, they’ll last for a good few months – I usually find they’re best within 3-4 months, but honestly, they’re still delicious even longer! And reheating? Nah, you don’t need to do that at all. These guys are meant to be enjoyed cold and crisp, straight from the fridge. That’s part of their magic!
Frequently Asked Questions about Fermented, Pickled, Gut-Friendly Foods
Got questions about making your own fermented pickles? I totally get it! It can seem a little mysterious at first, but once you get the hang of it, it’s a breeze. Here are some things people often ask:
Q: How long do these fermented pickles last in the fridge?
A: Once they’re in the fridge and tightly sealed, they’ll keep for a good few months! They’ll continue to ferment slowly, so they’ll get a bit tangier over time, but they’re usually at their absolute best within about 3-4 months. Just keep them chilled!
Q: What’s the big difference between these fermented pickles and the ones in the grocery store?
A: The main difference is the *process* and what that does for you! Regular pickles are usually made with vinegar, which gives them that sour taste quickly. These fermented ones use lactic acid bacteria, which naturally occur and create that tanginess. Plus, that natural fermentation process is what packs them full of all those amazing probiotics that are so good for your gut health. They just have a more complex, “alive” flavor, if that makes sense!
Q: Can I use other veggies besides cucumbers for fermentation?
A: Oh, absolutely! Fermentation is super versatile. Carrots, green beans, radishes, cauliflower, even peppers – they all ferment beautifully. The basic brine ratio and method stay pretty much the same, just adjust your packing and timing based on the veggie.
Q: My brine looks a little cloudy. Is that okay?
A: Yes, a cloudy brine is usually a really good sign! It means those beneficial bacteria are hard at work doing their thing. As long as it doesn’t have any weird colors or fuzzy mold, cloudy brine is exactly what you want to see. It means your fermentation is active and healthy!
Share Your Homemade Fermented, Pickled, Gut-Friendly Foods!
Alright, now it’s your turn! I’d absolutely LOVE to hear how your fermented pickles turned out. Did you try any fun spice combinations? How did you serve them? Drop a comment below and let me know – and if you snapped any photos, tag me on social media! Seeing your creations is the best part!
Print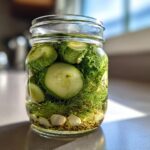
Tangy Fermented Pickles: Gut-Friendly Flavor 5 Ways
- Total Time: 5 to 14 days (fermentation)
- Yield: Approximately 1 pound 1x
- Diet: Vegetarian
Description
A simple recipe for making naturally fermented pickles that are good for your gut.
Ingredients
Scale
- 1 pound Kirby cucumbers
- 2 cups filtered water
- 1 tablespoon sea salt
- 2 cloves garlic, smashed
- 1 teaspoon dill seeds
- 1/2 teaspoon mustard seeds
- 1/4 teaspoon red pepper flakes (optional)
Instructions
- Wash cucumbers thoroughly.
- In a clean jar, combine filtered water and sea salt. Stir until salt is dissolved. This is your brine.
- Add smashed garlic cloves, dill seeds, mustard seeds, and red pepper flakes (if using) to the bottom of the jar.
- Pack the cucumbers tightly into the jar, ensuring they are submerged in the brine. You may need to trim them to fit.
- Place a fermentation weight or a smaller jar filled with water on top of the cucumbers to keep them submerged.
- Cover the jar with a lid that allows gas to escape, such as a fermentation lid or a regular lid with the ring loosened.
- Place the jar in a cool, dark place (around 65-75°F or 18-24°C) for 5-14 days.
- Check the pickles daily. You may see bubbles, which is a sign of fermentation. Skim off any white scum that forms on the surface.
- Taste the pickles after 5 days. When they reach your desired level of sourness, remove the fermentation weight and seal the jar tightly.
- Transfer the jar to the refrigerator. The pickles will continue to ferment slowly and will be ready to eat.
Notes
- Use non-chlorinated water for the brine.
- Ensure all equipment is clean to prevent unwanted mold growth.
- The fermentation time can vary depending on the temperature.
- Adjust the spices to your preference.
- Prep Time: 15 minutes
- Cook Time: 0 minutes
- Category: Preservation
- Method: Fermentation
- Cuisine: General
Nutrition
- Serving Size: 1 pickle
- Calories: 5
- Sugar: 0g
- Sodium: 200mg
- Fat: 0g
- Saturated Fat: 0g
- Unsaturated Fat: 0g
- Trans Fat: 0g
- Carbohydrates: 1g
- Fiber: 0g
- Protein: 0g
- Cholesterol: 0mg
Keywords: fermented pickles, pickled cucumbers, gut-friendly, probiotic, lacto-fermentation, homemade pickles